Coding with Vim & Using GitHub for Version Control
1. Vim:
The
Vim text editor we use in Windows is a clone of the Vi text editor
program for Unix/Linux. It is a defualt text editor for many developing
environment.
There
are quite a few commands, plug-ins for Vim and GitHub. We will just
cover the fundamental ones to get you started. You colleagues in the
industry (if you get an internship) are likely using Vim for
programming and using GitHub for version control. It's good to know
this.
Installation:
The official website for Vim is here:
https://www.vim.org/download.php
If
you use your person PC in the class, just go ahead to download it. If
you are using the desktop in a public environment and you don't have
the admin access to install software to the computer, you can also use
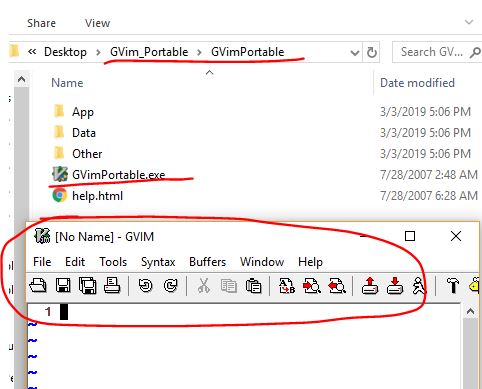
the portable Vim here. Extract the zip file under C:\Users\YOUR_USER_NAME\.......
You can find the executable file in the extracted folder. Just double click the 'GVimPortable.exe' to start Vim:
Use Vim as the text editor:
(from now on, please try to use Vim to write your code).
Vim often used commands: I showed you the ones I'm using all the time. Remember these ones, you will be good for now. You may find more commands here.
1.1 Basic Vim Commands
The
most simple commands allow you to open and close documents as well as
saving them. As with most other text editors, there are protections in
place to help you avoid exiting the editor without having saved what
you’re working on.
:e [file] - Opens a file, where [file] is the name of the file you want opened
:w - Saves the file you are working on
:w [filename] - Allows you to save your file with the name you’ve defined
:wq - Save your file and close Vim
:q! - Quit without first saving the file you were working on
:! python % - run the current script using Python
:set number - label the lines with numbers
:norm i# - comment line/lines
:norm x - uncomment line/lines
:new filename.py - create a new .py file in the same directory. The new file will be opened below the current edit window
:vert new filename.py - create a new .py file in the same directory. The new file will be opened beside the current edit window
:set guifont=* - set the font style and font size
1.2 Vim Commands for Movement
When
using movement commands, you can put a number in front of them to make
Vim complete a command multiple times. For example, 5h will move your
cursor five spaces to the left, and 90j will put your cursor at the
beginning of the 90th line down from where your cursor currently is.
h - Moves the cursor to the left
l - Moves the cursor to the right
j - Moves the cursor down one line
k - Moves the cursor up one line
H - Puts the cursor at the top of the screen
M - Puts the cursor in the middle of the screen
L - Puts the cursor at the bottom of the screen
w - Puts the cursor at the start of the next word
b - Puts the cursor at the start of the previous word
e - Puts the cursor at the end of a word
0 (zero) - Places the cursor at the beginning of a line (start a new line above)
$ - Places the cursor at the end of a line
) - Takes you to the start of the next sentence
( - Takes you to the start of the previous sentence
} - Takes you to the start of the next paragraph or block of text
{ - Takes you to the start of the previous paragraph or block of text
Ctrl+f - Takes you one page forward
Ctrl+b - Takes you one page back
Ctrl+ww - switch cursor among different vim windows
gg - Places the cursor at the start of the file
G - Places the cursor at the end of the file
# - Where # is the number of a line, this command takes you to the line specified
1.3 Vim Commands For Editing
Those
who use Vim tend to use the term “yank” where most people would use the
terms copy and paste. Therefore, the command for copying a word is yw,
which stands for yank word, and the command for pasting whatever has
been copied is p, meaning put. If you look up additional commands in
the future, it can be confusing if you don’t know what yank and put
mean when using Vim.
As with movement commands, putting a number
in front of the command can increase the number of times a task is
completed. For instance, putting a number in front of yy will increase
the number of lines copied, so 5yy will copy five lines.
i - insert in front of the cursor
a - instert after the cursor
I - insert at the beginning of the line
A - insert at the end of the line
o (ou, not zero) - start a new line below
O (ou, not zero) - start a new line above
yy - Copies a line
yw - Copies a word
y$ - Copies from where your cursor is to the end of a line
v - Highlight one character at a time using arrow buttons or the h, k, j, l buttons
V - Highlights one line, and movement keys can allow you to highlight additional lines
p - Paste whatever has been copied to the unnamed register
d - Deletes highlighted text
dd - Deletes a line of text
dw - Deletes a word
D - Deletes everything from where your cursor is to the end of the line
d0 - Deletes everything from where your cursor is to the beginning of the line
dgg - Deletes everything from where your cursor is to the beginning of the file
dG - Deletes everything from where your cursor is to the end of the file
x - Deletes a single character
u - Undo the last operation; u# allows you to undo multiple actions
Ctrl+r - Redo the last undo
. - Repeats the last action
r - replace the current letter to something else. Just type the updated letter after you type 'r'
1.4 Vim Commands for Searching Text
Like
many other text editors, Vim allows you to search your text and find
and replace text within your document. If you opt to replace multiple
instances of the same keyword or phrase, you can set Vim up to require
or not require you to confirm each replacement depending on how you put
in the command.
/[keyword] - Searches for text in the document
where keyword is whatever keyword, phrase or string of characters
you’re looking for
?[keyword] - Searches previous text for your keyword, phrase or character string
n - Searches your text again in whatever direction your last search was
N - Searches your text again in the opposite direction
:%s/[pattern]/[replacement]/g - This replaces all occurrences of a pattern without confirming each one
:%s/[pattern]/[replacement]/gc - Replaces all occurrences of a pattern and confirms each one
1.5 Vim Commands For Working With Multiple Files
You
can also edit more than one text file at a time. Vim gives you the
ability to either split your screen to show more than one file at a
time or you can switch back and forth between documents. As with other
functions, commands make going between documents or buffers, as they’re
referred to with Vim, as simple as a few keystrokes.
:bn - Switch to next buffer
:bp - Switch to previous buffer
:bd - Close a buffer
:sp [filename] - Opens a new file and splits your screen horizontally to show more than one buffer
:vsp [filename] - Opens a new file and splits your screen vertically to show more than one buffer
:ls - Lists all open buffers
ctrl+ws - Split windows vertically
ctrl+wv - Split windows horizontally
ctrl+ww - Switch between windows
ctrl+wq - Quit a window
Ctrl+wh - Moves your cursor to the window to the left
Ctrl+wl - Moves your cursor to the window to the right
Ctrl+wj - Moves your cursor to the window below the one you’re in
Ctrl+wk - Moves your cursor to the window above the one you’re in
1.6 Marking Text (Visual Mode)
Visual
mode allows you to select a block of text in Vim. Once a block of text
is selected you can use visual commands to perform actions on the
selected text such as deleting it, copying it, etc.
v - starts
visual mode, you can then select a range of text, and run a command V -
starts linewise visual mode (selects entire lines) Ctrl + v - starts
visual block mode (selects columns) ab - a block with () aB - a block
with {} ib - inner block with () iB - inner block with {} aw - mark a
word Esc - exit visual mode
Once you’ve selected a particular range of text, you can then run a command on that text such as the following:
d - delete marked text y - yank (copy) marked text > - shift text right < - shift text left ~ - swap case (upper or lower)
Simple Vim Workflow Example
If
you haven’t had a chance to play around with Vim much yet, you might be
wondering what a simple workflow looks like when using it. It’s
relatively simple:
Open a new or existing file with vim filename
Type i to switch into insert mode so that you can start editing the file
Enter or modify the text with your file
Once you’re done, press the escape key Esc to get out of insert mode and back to command mode
Type :wq to save and exit your file
Of
course, there is so much more you can do with Vim, however as a
beginner, the above steps are what a simple Vim workflow looks like.
2. Windows Command Line
dir - list the files in the current directory
cd .. - go back to the upper directory
cd C:\Users\..... - enter into a specific directory
copy fileToBeCopied.py fileToBeCreated.py - duplicate a file in the directory
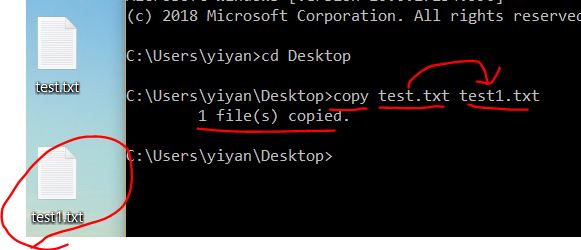
del fileToBedeleted.py - delete a file in the directory
When
install 'vim', check the box '.bat' to have vim included into the path
environment variable. This will enable 'vim' command in the command
line window.

To exit the vim mode, just type ':exit'.
3. Git
Git
is a distributed version-control system for tracking changes in source
code during software development. It is designed for coordinating work
among programmers, but it can be used to track changes in any set of
files. Its goals include speed, data integrity, and support for
distributed, non-linear workflows. Git was created by Linus Torvalds in
2005 for development of the Linux kernel, with other kernel developers
contributing to its initial development. Its current maintainer since
2005 is Junio Hamano.
If you are using your personal PC
(Windows), download it from www.git-scm.com. If you use the lab
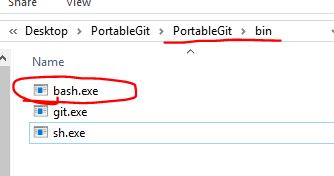
computer, you can use the portable version of git here.
Enter the following directory and double click 'bash.exe'.
Now, find a git server to upload your code:
There are a few git service providers:
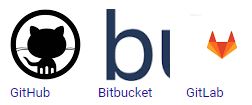
We will use GitHub for now. In the future, if you find BitBucket is better for your privacy it should be easy to change.
First,
go to github.com to register an account using your permanent none-FLC
email (so you can keep using it after you graduate).
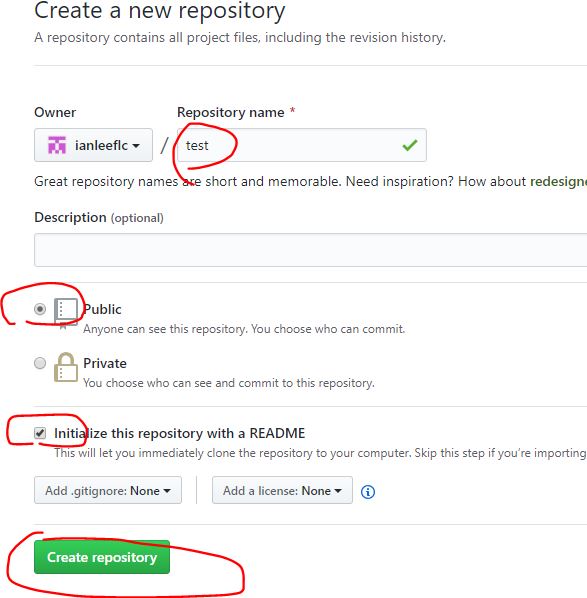
Create a new repository:

Give a name to your new repository:
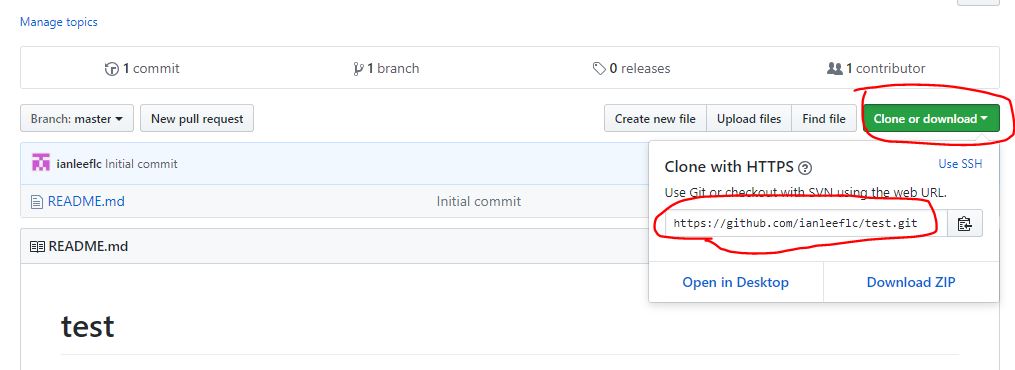
Click the 'Clone or download' button and copy the link in the window.
Type
'git clone http://.........' (copy and paste the link) in the command
line window. Before you do this, make sure you are at the directory you
want to use. I just use Desktop here:

Press 'Enter', the repository will be downloaded to the designated folder as a new folder.
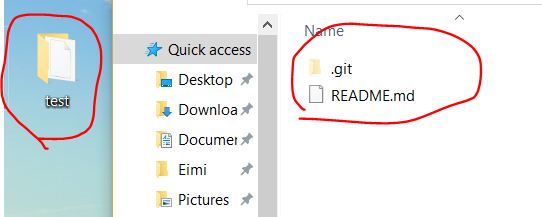
Keep
the .git folder there. The .git folder keeps the folder a Git folder
but nothing else. Create a new '.py' file in this folder.
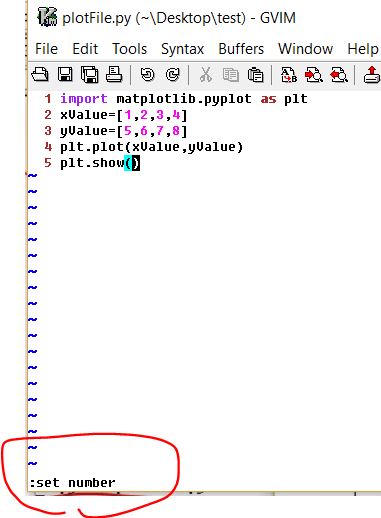
1. You can find gVim from your start menu and type ':new plotFile.py' to create a new file.
2. Or you can Right Click an empty '.py' file and create it using Vim.
Type
the following simple plotting python code in Vim. When you are done,
save the changes first using ':w' + Enter, then type '! python %' +
Enter to run the code: (% represents the current script so you don't
have to type the name of the current file)
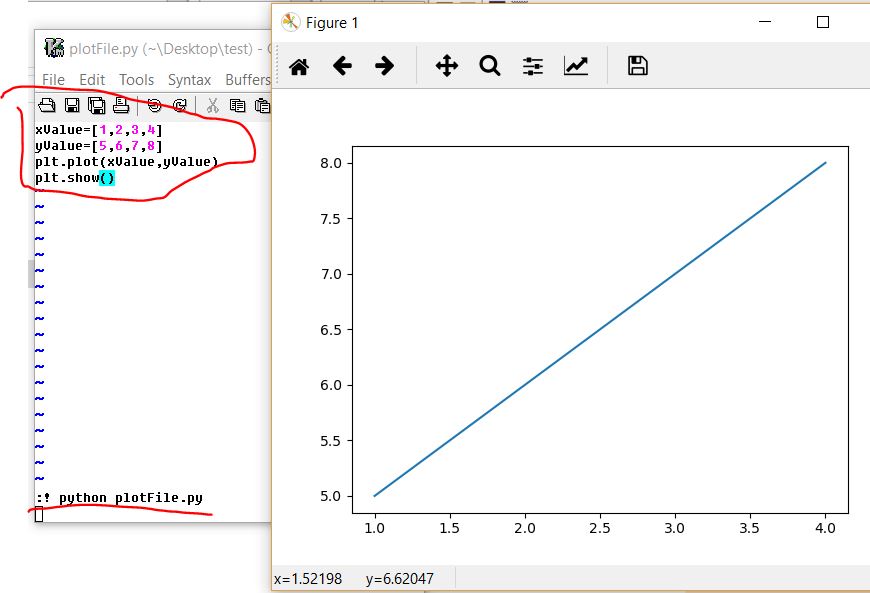
You can add Line Numebers (':set number') and change the font size (':set guifont=*'):

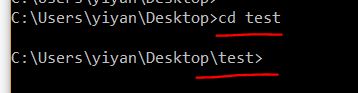
Type ':wq' to save and quit the current file. Go back to the command line window. Enter the repository folder:
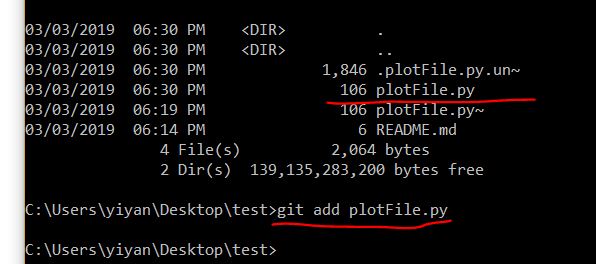
Type 'dir' to show all the files in the folder:
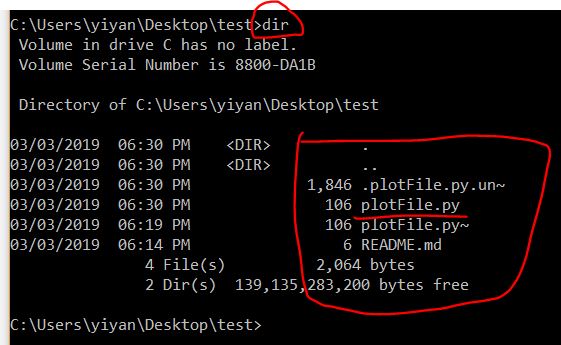
By looking at what you have in the folder (temperary local repository), you know which one you want to upload to GitHub:
The
'git add ....' command will add the 'to be submitted' file to a
temperary buffer in your local drive. So nothing is submitted yet.
Next, type git commit -m "A new matplot py script":

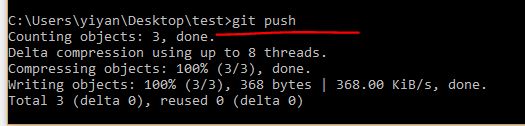
Last, git push:
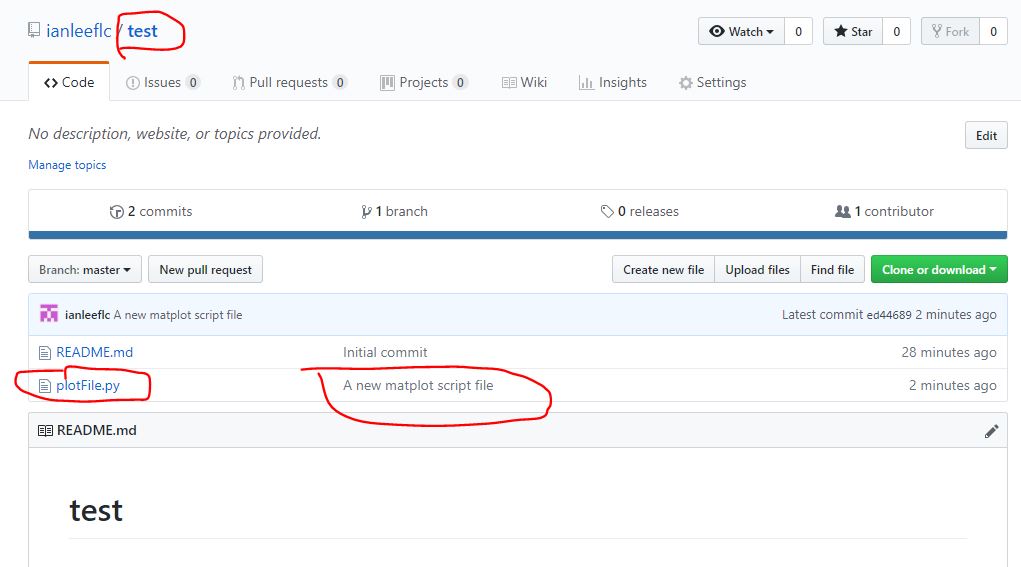
Go
back to the GitHub, sign in with your account and go to your
repositories. You can see the updated repository is already there (with
the message you put in 'git commmit -m').
The
above tutorial just covers the fundamental 'clone' and 'push'
operations. There are many more operations like 'pull', 'merge' and
others. After you know how to do the operations above, it must be very
simple to learn others.